


Recycling waste pallets to make wooden flower pot sets/set flower pots

Today we provide an interesting hands-on opportunity for DIY enthusiasts who love do-it-yourself woodworking. Use your familiar production tools to turn a common standard pallet into a beautiful decorative wooden flowerpot cover for your living room.
DIY woodworking flower pot covers require materials: wooden pallet, screwdriver, pliers, electric drill, carpentry glue, ruler, screws, clear oil, paint, brush, gloves, goggles.
1. First, let’s understand the basic structure of this wooden flowerpot cover. It consists of two parts: side panels and bottom panels. Among them, the side panels are made of eight wooden boards spliced together through V-shaped openings, while the bottom board is formed by two vertical wooden boards snapping together. The diagram below provides a simple guide to relative dimensions.
The base plate and side plates are directly connected by drilling holes and tightening screws.
2. Remove the iron nails on the surface of the old pallet and restore it to scattered wooden boards. After cutting the wooden board according to the guiding dimensions given in the first picture, we further cut, process and polish the wooden board.
3. Use Mugong glue to stick the side panels of the wooden flower pot cover. Before the glue dries, use a tie to only tie the sides of the flower pot cover.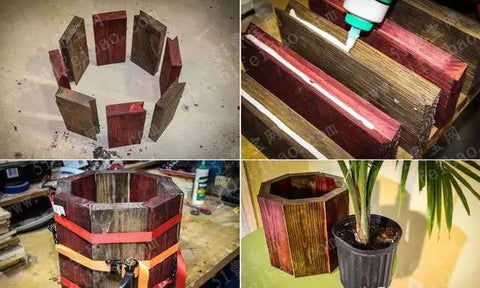
Please refer to the demonstration picture below for the specific sticking principle. Each wooden board is stuck by the L-shaped interface of the side wooden board, and at the same time it holds up the next wooden board.
4. Continue to use the remaining wooden boards removed from the old pallet in the first step to make the bottom plate of the flowerpot cover. Tighten the screws between the two bottom plates.
5. Drill holes and tighten screws to connect the side panels and the bottom panel, and then paint them uniformly. A beautiful DIY flowerpot cover full of pastoral style is ready.
